Easy To Make Christmas Ornaments:
Stamped Clay Ornament
If you are looking for some easy to make Christmas ornaments, then this stamped clay ornament idea may be a fun project for you. Whether you are looking for a unique idea for yourself or an easy kids Christmas craft for your child, this is a great project! You can apply this technique to almost any shape and stamp you want to use. We will show you how to make the design that is pictured, but you could try many other looks as well!


Materials for Easy To Make
Christmas Ornaments: Stamped Clay
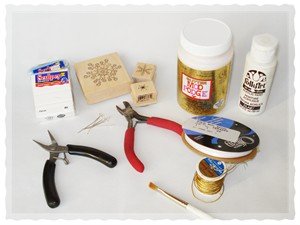
What You Will Need:
- Polymer clay (shades of blue)
- 3 Snowflake stamps
- 5 Eye pins
- Needle nose pliers
- Wire cutters
- Mod Podge (glitter or regular)
- White paint
- Paintbrush
- White ribbon
- Gold thread
Instructions for Easy To Make
Christmas Ornaments: Stamped Clay

Step 1:
This first step can be applied to any stamp or design you choose. Select the color of clay you want to use as the background color and roll it into a ball. Then flatten it out until it is about 1/4" thick. This can be done evenly by pressing it between two hard flat surfaces like a notebook or binder against a table. You want the flattened clay to be just big enough for your stamp to fit on, so the size and shape of your piece of clay will vary, depending on your stamp. See photo A.
Step 2:
Make two more of these flattened clay circles. You want to have one for each of your three snowflake stamps. In our example, we used a large, medium and small snowflake, so we made a large, medium and small clay circle.
Then take your stamp and firmly press the stamp into the clay. Do this for each of the snowflakes. If you do not like the way the stamp turned out, you can always knead the clay again and re-flatten it. See photo B.


Step 3:
Next, take out some clay in another shade of blue or white. Roll the clay into a ball and then begin to roll it out into a very long and thin piece. This piece will then be wrapped around the perimeter of the clay circle. See photo C above. Do this for each of the three clay circles. Be sure to firmly press this border on, or it may pop off later.

Step 4:
Now you will be hooking the eye pins together. To do this, you need to cut each eye pin down to about 1/2" using your wire cutters. Then, using your needle nose pliers, open the hook on two of the eye pins. Then hook on a second eye pin on each, and close the hook again. See photo D. You should now have two sets of hooked pins and one loose eye pin.
Note: It is best to join the eye pins together before placing them in the clay so you won’t mess up the clay. Or, if you did it after baking the clay, it may break the pins loose when bending the hooks open.

Step 5:
Decide in what order you want the three snowflakes to hang, and line them up. Take the one single eye pin and stick it straight down into the top of the top snowflake. Be sure the eye faces sideways (so if you looked at the ornament sideways you could look through the eye of the pin). This way when you hang it on the tree with the thread, it will hang straight.
Now take a pair of eye pins and poke one into the bottom of the top snowflake and the other into the top of the middle snowflake. Be sure that the eyes of the pins are perpendicular to each other so they hang straight. See photo E. Repeat this for the other pair of pins and the middle and bottom snowflake. Your ornament should now look similar to photo F.

Step 6:
Your ornament is now ready to bake. Carefully transfer the ornament onto some foil and a baking sheet. Bake it according to the clay’s packaging instructions.
When your ornament is done baking and has cooled, you can begin painting it. To do this, thin your white paint with a little water. Then begin to paint over the stamped images. The paint should be thin enough so that it can run into the grooves of the stamped image. When you are happy with how it looks, take a damp napkin or cloth and carefully wipe the excess paint off the surface of the clay. The paint in the grooves of the stamp should still be there. See photo G. Do this to each of the three snowflakes.


Step 7:
Once the paint has dried, you can then paint over the entire ornament with the Mod Podge sealer. This will give the ornament a shiny or sparkly finish. Let the sealer dry for at least 12 hours. Then finish off your ornament by using your ribbon to tie a bow around the eye pin of the top snowflake. Then tie on a piece of gold thread to hang your ornament by.
Your stamped clay ornament is now finished!
Now that you know the technique, you could be very creative with this project. Since any stamp will work, have some fun and see what great looking ornaments you can come up with.
Looking for other easy to make Christmas ornaments? Click the link below.
Return to Christmas Crafts from Easy To Make Christmas Ornaments:
Stamped Clay Ornament

Mary Says:
Great idea and instructions! Thanks! I made very small versions of these and turned them into Christmas earrings.
Amanda Says:
Just dropping by to let you know that I linked to this post in a round up today from the Home & Garden channel at Craft Gossip. :) This will appear in the main Craft Gossip RSS feed, on the main home page and can be found directly here http://homeandgarden.craftgossip.com/9-snowflake-craft-projects/
Charice Says:
i love crafting, and this idea is just straight down wonderfull. Im gonna buy my supplies now
Sara Says:
Thanks this give me ideas that I can use with my Granddaughter.
Easy to Make Christmas Ornaments: Stamped Clay