Easy To Make Christmas Ornaments:
Painted Swirl Ornament
Here are some very easy to make Christmas ornaments. They are so fun and simple to make, that they would be a great project for all ages. If you have been wanting to find a kids Christmas craft to set your child up with, this is a great project for you! Or if you have been looking for some easy homemade gift ideas, this also would be a great idea. You could make up an entire set to give as a Christmas present!
You could be very creative with this technique, and do many designs beyond what we have shown here. Why not try stripes, zig-zag patterns, or solid colored circles? Read through what we have here, and then get creative with other designs!


Materials for Easy to Make Christmas Ornaments:
Swirl Ornament
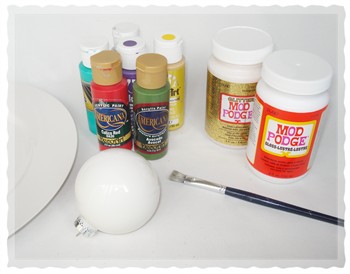
What You Will Need:
- Glossy ornament ball
- Glazed plate (from dollar store)
- Acrylic paint (in several colors)
- Paint brush
- Mod Podge sealer (regular or glitter)
Important Note: It is important to use a glossy ornament ball because a matte ball will have no cling. It is important that your “palette” (the plate) has a glazed finish in order to give the paint the right cling. You can find a cheap glazed plate at your local dollar store. Do not use wax paper; the paint circles will have no cling. We also found that a plastic palette didn’t give the paint much cling.
Instructions for Easy to Make Christmas Ornaments:
Swirl Ornament
Step 1:
First, decide on a color scheme. Each circle of paint could have two to three colors. We used two colors in each circle. Then you need to decide how many different colored circles you are going to want for each ornament. We used two different colors of circles (ex: red with silver, and green with silver).
Step 2:
Start by making circles of paint, about the size of a quarter, on your plate. To do this, squeeze out a dab of paint for each color in your circle. Make sure the paint dabs for each circle are close to each other on your plate. Each dab should be a little larger than a pea. See photo A.


Step 3:
Now, using the end of a paint brush (NOT the bristles of the brush), swirl the dabs of paint together. See photo B. Don’t over blend the paint, because too much swirling and you just end up with a new color! You’ll need about 30 to 35 of these swirl circles (about the size of a quarter) to cover a standard size ornament ball. See photo C.

Step 4:
After you have made all of your swirl paint circles, you need to let them dry completely. At least 12 hours.

Step 5:
Carefully peel one dried paint circle off your plate. Any uneven edges of the paint that you don’t like can easily be trimmed off with scissors. Now place it on your ornament near the top. Press it on nicely so that there are no wrinkles and it is completely adhered to the surface of your ornament. Continue peeling one at a time and firmly pressing onto your ornament. Start by placing them around the neck of the ornament and work your way down from there. See photo D.
Step 6:
After your ornament is completely covered, paint a coat of Mod Podge sealer over it. Then hang it to dry.

Your painted swirl ornament is now finished!
Return to Christmas Crafts from Easy To Make Christmas Ornaments

Sharon Says:
Really like them. Look great! Will definitely make some. Simple, but elegant.
adrian Says:
cool awesome for the whole family to do
Sharon Says:
Neat and looks really easy!
Joyce S. Says:
These are awesome ~ gotta do with the grandkids!
madaline Says:
cool
CreativeMe Says:
Love this, great idea!
elizabeth m l Says:
love them
margie Says:
Wow these are really neat thanks
susie Says:
OMG my leopard design is too cute love it
dica Says:
legal (cool)
Sara Says:
Thanks
angels Says:
esto es divertidisimo de hacer,parecia mucho mas dificil,despues de ver el aspecto que queda una vez terminado,gracias me he quedado con todos,un beso,angels (This is very fun to make, it seemed much more difficult, but not after seeing how it was done once, thanks I have stayed with everything, a kiss, angels)
raina m Says:
takes awhile though but is very cool
Vicki F Says:
Wow, these look terrific!