Free Crafts For Children:
Stained Glue Shamrock Crafts
Searching for some free crafts for children for St. Patrick's Day? Your kids are sure to have fun making these stained glue shamrock and rainbow crafts. They look like stained glass but they are an inexpensive version using glue instead.
Maybe you are having a St. Patrick's Day party this year? Well then these stained glue shamrocks would make great homemade party decorations to hang on your wall or window. So if you have been looking for decorating ideas or an easy craft for kids, then this is a great project to try! We have provided the instructions and a shamrock template, which includes 2 shamrock designs, a rainbow and a horseshoe.

Materials For Free Crafts For Children:
Stained Glue Shamrock Crafts
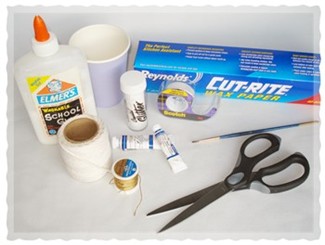
What You Will Need:
- White string
- Thread or ribbon
- Wax paper
- Tape
- Elmer's glue
- Paper cup
- Watercolors
- Paintbrush
- Scissors
- Black pony beads 1/4" (optional)
- Glitter (optional)
Instructions For Free Crafts For Children:
Stained Glue Shamrock Crafts
Step 1:
Print out the shamrock template. Tape the template to your table and then tape a piece of wax paper over the shamrock template.

Step 2:
Now measure and cut each piece of string. The approximate length of each piece of string is printed on the shamrock template. The lines are different shades to indicate the different pieces of string on the shamrocks.
Step 3:
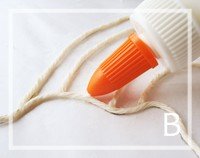
Put just enough glue in your paper cup to cover a piece of string. Saturate each piece of string with glue. As you pull the string out of the glue, use your thumb and finger to go down the string to remove the excess glue. See photo A.
Step 4:
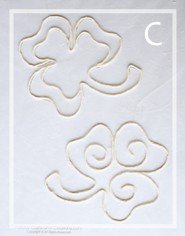
Lay the string along the lines on the shamrock template. Try your best to keep any joints or ends glued together. To help with this, put a dab of glue on each joint or connecting spot to help reinforce them. See photo B.
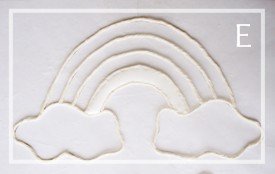
Once all of the strings have been laid in place, your designs should look similar to photos C and D.

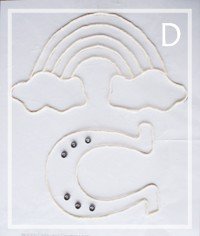
On the horseshoe template, glue your beads into place on the wax paper over the small circles on the template. See photo D. Gluing the beads to the wax paper will keep them from moving when you mix the glue and paint together in step 6.
Step 5:
Now carefully slip a long piece of thread or ribbon underneath the string at the top of each design. Pull the thread snug against the edge of the string and tape it down so it stays in place while you are working.
Let the strings dry for at least 12 hours.
Important note: It is very important to let the strings dry completely before the next step. If they are not completely dry, the color from the paint will bleed out into the strings.
Step 6:
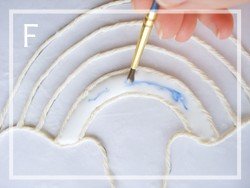
Once the strings are completely dry, it's time to fill in the spaces with glue and color them. Fill one space at a time with enough glue to nicely fill the section. See photo E.
Before you fill the next space in with glue, mix some watercolor paint into the glue with your paintbrush. See photo F. It doesn't take too much paint to achieve a nice shade of color. Just be careful with the amount because they tend to dry into a darker color. Mix the paint thoroughly. Now repeat this for each section in each design.
Step 7:
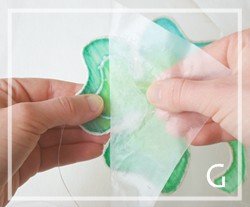
Let them dry for at least 24 hours, and it might even need a little more time beyond that. When it seems completely dry you can carefully remove it from the wax paper. See photo G. Make sure to peel the wax paper off slowly and carefully, while not bending the shamrock.
Tie a knot in your thread so you can hang it. Cut off any extra thread. There may be some extra pieces of glue around the edges of the strings that you will want to trim off.
Your stained glue shamrocks are now finished!

For more free crafts for children, click the link below and see our other fun and easy craft ideas.
Return to St. Patrick's Day Crafts from Free Crafts For Children:
Stained Glue Shamrock Crafts

Be the first to comment on this project!