
Homemade Centerpieces:
Felt Christmas Tree Centerpiece
Looking for ideas for homemade centerpieces for your holiday table or display? This Christmas tree centerpiece is very cute and festive. While this craft project may take awhile to complete, it is really quite simple and even your kids could help out. And when you are done, you have a cute decoration that you will be proud of! The materials for this idea are rather inexpensive, which also makes it a great family project.
 Homemade Centerpieces: Felt Christmas Tree Centerpiece
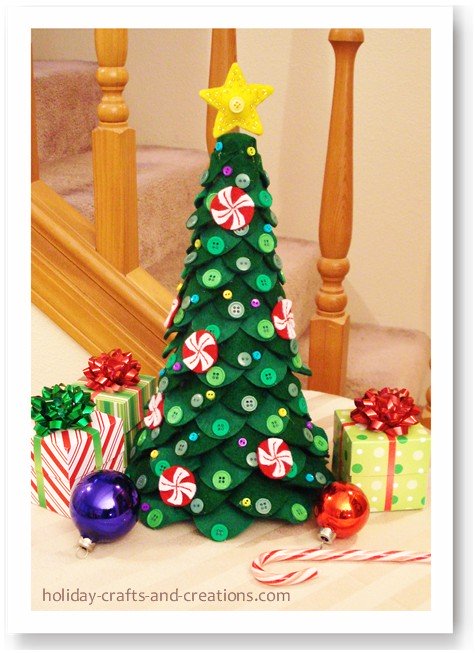
Materials for Homemade Centerpieces -
Felt Christmas Tree Centerpiece

What You Will Need:
- Styrofoam cone (12" x 4-7/8")
- Felt: green (2 shades if desired), red, white, yellow
- Green buttons (about 115)
- 2 yellow buttons
- Small buttons in assorted colors (about 40)
- Yellow seed beads
- Embroidery thread: red and yellow
- Sewing needle
- Thin bead needle
- Wire - 4" (Straightened paperclip)
- One cotton ball
- Hot glue gun
- Scissors
Instructions for Homemade Centerpieces -
Felt Christmas Tree Centerpiece
Step 1:
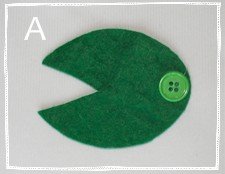
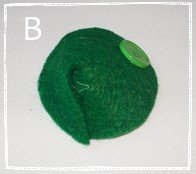
Begin by printing out the Felt Christmas Tree template. The basic idea of making each bough is quite simple. Trace the pattern onto your felt and cut it out. Hot glue a button onto the end of the piece. Then hot glue just one of the pointed ends and bring the other pointed end over on top of it, creating a cone-like shape. See photos A and B. This is how every piece will be made. The next step will give you the details as to how many and of what size.
Step 2:
If the cone you are using is the same size as listed in the materials, than you can follow this step exactly. If you are using a different size cone however, you can get the general idea but change the quantities as needed.
Note: Size 4 on the template sheet is there if you decide to make a tree on a very large cone, but if you are using a 12" cone (like we did) or smaller, you won't need size 4.
The cone will take a total of 16 rows of boughs to cover it completely. For our tree, we alternated between a green and dark green felt for every row. This is optional. The number of pieces you will need to cut out and of what size is listed below, starting at the base of the cone and working up.
- Rows 1 and 2: Cut out 10 for each row (20 total) of size 3 bough
- Row 3: Cut out 9 of size 3
- Row 4: Cut out 8 of size 3
- Rows 5, 6 and 7: Cut out 8 for each row (24 total) of size 2
- Row 8: Cut out 7 of size 2
- Rows 9 and 10: Cut out 6 for each row (12 total) of size 2
- Rows 11 and 12: Cut out 6 for each row (12 total) of size 1
- Rows 13, 14 and 15: Cut out 5 for each row (15 total) of size 1
- Row 16: Cut out 4 of size 1
Step 3:
Now that you know the pieces you will need, you can begin constructing your Christmas tree! For every piece, glue a button on the end and glue the points together as described in Step 1.
Pick one side of the cone to be the front of the tree. You will always start each row from this side. While ideally, every bough would fit nicely between the two below it, that is very hard to do and sometimes the boughs will overlap. By choosing a front, all the overlapping and smooshed boughs will be in the back. If this doesn’t make much sense right now, it will as you begin working.
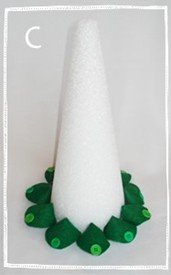
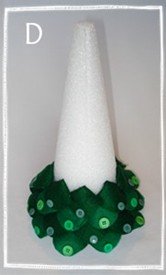
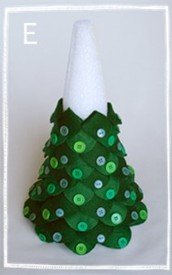
Begin to hot glue the first row (bottom row) onto the cone. To glue on each piece, put hot glue on the side where the two pointed ends were hot glued together. Then quickly place the piece on the cone and hold it there for a few seconds while the glue cools. Continue to do this until you reach about row 12. See photos C, D and E for how this should be looking.
Step 4:
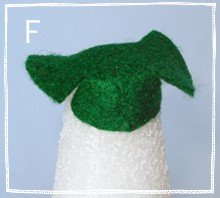
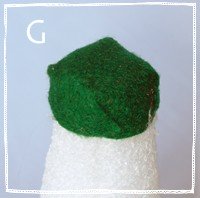
Once you are around row 12, stop and cut out the pattern that is a circle with four lines on the edges. Trace this onto green felt and cut it out. Make slits in the felt where the lines are. Now hot glue the center of this circle to the top of your cone. Then glue down two opposite flaps. See photo F. Now glue down the other two remaining flaps. See photo G. This piece creates a nice felt covered top to your tree.
You can now finish gluing on the boughs.
Step 5:
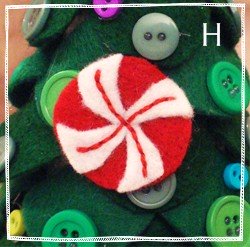
Now that the tree is mostly done, it is time to make a few of the embellishments! Cut out the peppermint pattern and make 10 to 15 circles out of red felt. Now cut out just the portion of the pattern that will be the white stripes. Trace this onto white felt 10 to 15 times. Each white piece is then sewn onto a red piece in red embroidery thread, using the
backstitch
. See photo H for an up-close look. Once all of these are finished, hot glue them on the tree as you like.
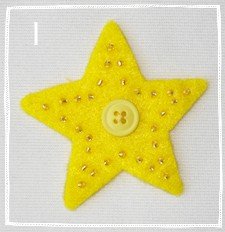
Next, for the star, trace and cut out two of the star pattern on yellow felt. Sew a yellow button onto the center of each piece, and then sew yellow seed beads around the edge of each piece (a thin bead needle is needed for seed beads). See photo I. Then place both sides together and begin to stitch the
running stitch
around the edge. Before you completely sew them together, place a cotton ball in between them to give the star a little puffiness. Then tie the thread off.
Step 6:
Just a few finishing touches and your tree will be done! Take your piece of wire and poke it straight down through the top of the cone. This may be difficult since there is hot glue on the top, so use a small nail or something sturdy to get the hole started if necessary. Then just work the star onto the wire so the wire is inside the star.
To complete the tree, just hot glue your tiny colored buttons all over the tree to look like Christmas lights!
Your felt Christmas tree centerpiece is now finished!
Return to Christmas Crafts from Homemade Centerpieces -
Felt Christmas Tree Centerpiece

amanda Says:
i just made one of these (bored, recovering after surgery) and i used sequins instead of buttons, and stitched them on. i also used sequin pins to attach the felt pieces to the cone. looks great!!!
Reenec Says:
Love this idea for next year. Great job
Wayne Says:
Soooo lovely! I have been looking for a slim Christmas Tree that will fit my small house but couldn't find one. I'm very much excited to try this! :D
Raquel Says:
Making this as a gift. My coworker loves Christmas decorations.
Kelli from Holiday Crafts and Creations Says:
Hi JOJO, This project needs a really strong glue. Maybe a strong tacky glue would work, but we are not 100% sure that it would. A glue like Elmer's would definitely NOT work. We're sorry that we can't be any better of a help.
JOJO Says:
what could i do if i want to make these with my students and don't want to use hot glue?
christy Says:
This is so great,,,i think it will be a great thing for the kids to make too,,,, thanks,,
Iwona Says:
Very beautiful!
FRANCES Says:
I CAN NOT WAIT TO MAKE THIS ITEM. IT LOOKS GREAT.
Doris Says:
Bellisimo y facil, muchas gracias Un abrazo (very pretty and easy, thank you very much. Hugs)
Asma Says:
WOW IT'S VERY CUTE
Violeta Says:
Hello you work is beutiful, thanks
zari Says:
i liked very much
Sweets Says:
Love the tree!! Very Beautiful!
Ross Says:
Me encanto¡¡ muy lindo¡ (I love this!! Very pretty!)
Elina Says:
Love it! I'm making a really small for my sister who just loves miniature items :)
Thankyou!
SewSpecial Says:
Very orginal and simple. Making them for seniors in the small rooms, Thank.
mollymuffin Says:
this is the cutest tree I am going to make one for my mantel and one for my daughter to put in her dorm room
Kelli at Holiday Crafts and Creations Says:
Great question Toni! The size 4 template is just there if you decide to make a tree using a much larger cone than the 12" cone we used. Otherwise, you won't need the size 4. We will fix our instructions to make that more clear. Thanks Toni!
Toni Says:
Love the tree. I do have one question, where do you use the size 4 template?
mariasun Says:
que idea mas bonita y muy original. (That is a most beautiful and very original idea.)
Helena Says:
Adorei seus trabalhos e vou fazer.
beijos!!!!!!!!!!!!!!!!!!!!!!!!
(I adore your work and will go make it. Kisses!)
Homemade Centerpieces: Felt Christmas Tree Centerpiece