
Thanksgiving Crafts To Make:
Mini Cornucopia
These mini cornucopias are fun Thanksgiving crafts to make. They only measure about 5" long, so they make really cute little cornucopias that would be perfect to place on each guest's plate at your Thanksgiving dinner. They could be filled with mixed nuts, raisins, dried cranberries or other dried fruit. They would be a cute way to serve a snack to your guests while they wait for dinner.
Thanksgiving Crafts To Make: Mini Cornucopia

Materials For: Thanksgiving Crafts to Make -
Mini Cornucopia
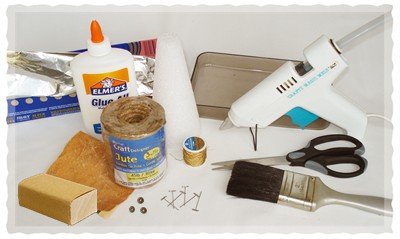
- 45 lb. jute
- 3" x 6" x 3/4" Styrofoam cone
- Elmer's glue
- 80 grit sandpaper & 120-150 grit sandpaper
- Sanding block (wooden block or even a dry sponge)
- Aluminum foil
- Three small wooden beads
- T-pins
- Gold thread (optional)
- Hot glue gun
- Tray or paper cup for gluing in
- Large paint brush (1" to 2" wide)
- Scissors
Instructions For: Thanksgiving Crafts to Make -
Mini Jute Cornucopia
Step 1:
To begin, print out the Styrofoam Cone Template. Now, get out your 80 grit sandpaper and your styrofoam cone. Hold the cone up to the template and begin to sand down the areas of the cone that are unwanted. Putting the sandpaper on a sanding block (or just wrapping it around a small block of wood or dry sponge) may make it easier and faster to sand down the cone.
Be sure to not sand away very much of the tip or the bottom. As you can see on the template, these areas do not need much sanding if any, and if you sand too much, your cone will be smaller than it should be. The grey checkered part of the template labeled “Styrofoam Cone” in the key is the area that should be left un-sanded so you have somewhere to hold onto while working with the cornucopia.
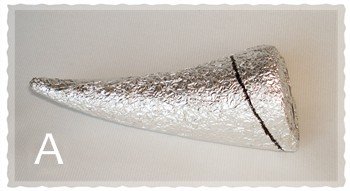
Once the cone is roughly shaped as the template shows, you may want to use 120-150 grit sandpaper (finer) to smooth out the cone. When the cone is finished it should look similar to photo A, minus the foil. We have drawn on a black line on the foil to indicate where you will start wrapping the jute in the upcoming steps.

Step 2:
Before you begin making the cornucopia, you need to wrap the cone in aluminum foil. This way the cornucopia will come off the cone easier. Once the cone is completely covered in foil, take a pencil and smooth out the foil so it is tightly formed to the cone. See photo B.
Step 3:
Next you will be wrapping the jute around the cone. It will take at least 20 feet of jute, but you may want to give yourself a few extra feet so you don’t come up short.
Before you begin wrapping the jute, get it wet by putting it under some water. It should be damp but not soaking wet.

To begin wrapping the jute around the cone, take several T-pins and pin the first wrap around the base of the cone (black line in photo A), pinning every inch so this first wrap won’t sag down. Now continue wrapping the jute around the cone. Keep the wraps of jute snug together by pushing down as you wrap. You want to be sure that no foil shows through the jute. Every few wraps around put a T-pin in to secure it. Photo C shows how the cone should be looking.
You might want to count how many pins you are using so you are sure to get them all removed later.
To finish the tip of the cone, keep wrapping the jute around the tip until there is no cone left and then fold the end of the jute over and pin it down. No foil should be showing. At this point, cut any extra jute off.

Step 4:
Now, in a tray or paper cup, pour out some Elmer’s glue. Add just a very small amount of water so the glue is thinned enough to brush on. Brush on the glue liberally (See photo D). You are trying to saturate the jute in glue. If you don’t get it really wet, it will easily fall apart later. You may even want to gently squeeze the cone with your hand to help work the glue into the fibers.
If you want to embellish the cornucopia with gold thread or cord, you should now wrap the thread around the cornucopia in whatever design you like. For ours, we criss-crossed the gold thread starting at the base, wrapping up to the tip, and then wrapping it back down again. This way both the ends of the threads will later be hidden under the rim of the cornucopia.
Now coat the cornucopia in a final layer of glue.
Step 5:
The cornucopia now needs to dry. It needs to be completely dry before you remove the form. To speed up the drying process, you can place the cornucopia in the oven at no higher than 150 degrees F. Stand it up on it’s base and place it on some foil. In the oven it may take several hours to dry completely. Check it every hour to see if it is dry.
If you don’t use the oven, and you simply set it somewhere to dry, it could take a day or two.
The glue will dry clear, but just because it has turned clear does not mean it is fully dry. It is very important that it is completely dry before you do anything else.
Step 6:
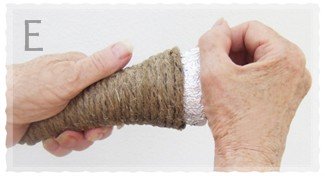
Once it has completely dried, take all the pins out. You must get all the pins out or you will break the cornucopia while trying to get the form out.
Now grab the cornucopia with one hand and the end of the form with the other hand. Gently but firmly twist both pieces back and forth until the cornucopia comes loose from the form. Take your time with step. This is the most important step in this whole process, as a mistake here will break the cornucopia and cause you to start completely over. See photo E.
If you end up with any cracks in your cornucopia, fill them in with tacky glue using a tooth pick.
Step 7:
Next you will construct the rim of the cornucopia. Get out your hot glue gun and get it heating up. Then take three strands of the jute that are about 12 inches long each and braid them. Cut one end of the braid to make a nice clean and even end. Begin to hot glue around the rim of the cornucopia. Only glue about 1/4 of the way around, starting at the bottom. While the hot glue is still hot, place the braid in the glue with the even cut end at the bottom of the cornucopia. This way the seam for the braided rim will end up on the bottom. See the first picture on this page to see what the rim looks like.
Now continue to glue the rest of the way around the rim, gluing the braid down as you go. Once you are back around at the bottom, cut the braid so that it meets up perfectly with the other end, and then glue it down.

Step 8:
While your glue gun is still on, take out three small round wooden beads. Hot glue two on along the rim, and a third further down the bottom of the cornucopia to form a triangle. See photo F.
You are now done with your mini cornucopia!
Instructions For: Thanksgiving Crafts to Make -
Mini Felt Cornucopia
The felt cornucopia is easier and faster to make than the jute cornucopia, and turns out looking very nice as well. This is one of our favorite Thanksgiving crafts to make.

These mini cornucopias would also be fun to fill with a bag of candy and hand them out to friends or family.
What you will need:
Same supplies as for jute version except brown felt as well.
To make the cone form, see Steps 1 and 2 above.
Step 1:
Print and cut out the felt template. Trace the pattern onto a sheet of brown felt and cut out the piece of felt.
Step 2:
Get the felt completely wet, and then pat it down with paper towels so it is still damp but no longer dripping wet.
Wrap the wide end of the felt around the base of the form and pin it down with a T-pin every inch or so. See photo A.


Step 3:
Now wrap the two sides of the felt together around the form and place a T-pin every inch up the seam to hold it together. See Photo B.
Step 4:
Once the felt is completely pinned onto the form, pour some Elmer’s glue into a tray or paper cup. Add just a little water so that the glue can be brushed onto the felt. Then brush the glue onto the felt cornucopia, making sure to get it completely covered in glue.
Now the cornucopia needs to dry completely. You can place the cornucopia in the oven at no more than 150 degrees F. Stand it up on the base of the form and place it on foil on a tray to go in the oven. It could take a few hours, but be sure to check it every hour to see how it is drying.
Step 5:
Once the cornucopia is completely dry, remove all the pins you put in it. Then grab the felt with one hand and the form’s base with the other, and gently but firmly twist them back and forth until the form comes free from the cornucopia.
Now to add a rim and the feet, see steps 7 and 8 from the instructions above, and you are done with your felt cornucopia!
For more Thanksgiving crafts to make, click the link below.
Return to Thanksgiving Crafts from
Thanksgiving Crafts To Make: Mini Cornucopia

Lorri Says:
Looking at the picture gave me the idea to use sugar cones as the cornucopia. My grandkids and I decorated them with edible decorations and icing. We placed small candies, nuts, and fruit in them. They look great! And taste good too.
MAMAOSI Says:
Good idea! all I was looking for! I'm gonna make it!
jisa Says:
v nice idea
Joyce Says:
I love this idea, its very festive.
Anna R. Says:
These are really nice! And a great tutorial, thanks!
Brenda Says:
WOW! Cute little cornucopias!
Thanksgiving Crafts to Make: Mini Cornucopia