
Homemade Halloween Decorations:
Halloween Garland
If you need some homemade Halloween decorations, than this felt Halloween garland makes a spooky wall hanging to get your home ready for this Halloween! Felt is very easy to work with and we have used simple embroidery stitches that anyone can do! This project also is very inexpensive, but yet it is a cute addition to your Halloween decorations. We have provided the step-by-step instructions and the Halloween sewing patterns that you will need to complete this garland.
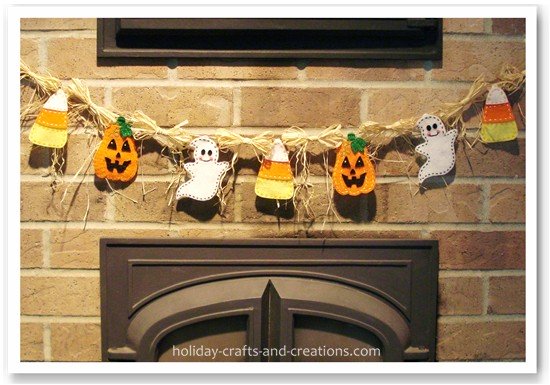

Materials for Homemade Halloween Decorations: Halloween Garland
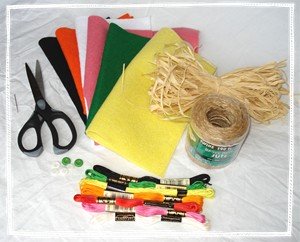
What You Will Need
Felt: orange, green, black, white, pink, yellow
Embroidery thread: orange, green, black, white, pink, yellow
Buttons: 5 white, 2 green (About ½” with 4 holes)
Jute or String (About 48”)
Raffia
Needle
Scissors
Note: The finished garland is about 36” long. If you want your finished garland to be longer, just add a few more ghosts or pumpkins.
Instructions for Homemade Halloween Decorations: Halloween Garland
Step 1:
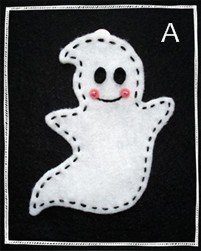
Print out the Halloween garland template. Trace and cut out 2 ghosts from white felt. Stitch around the border of the ghosts with black thread, using the running stitch. The stitches should be about 1/8” in from the edge. See photo A. Now cut out the eyes for the ghosts from black felt. Stitch them on with black thread using the running stitch around the edge. To make the mouth for the ghosts you will also use black thread. Start by drawing a light pencil line as a guide to where you will want the mouth. Then stitch the mouth using the back stitch. After you are done stitching the mouth, cut out the cheeks from pink felt. These will be stitched on using a French knot. Again, see photo A.
Step 2:
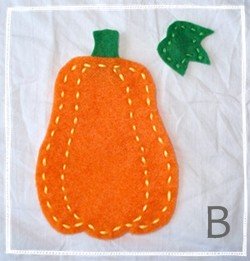
Trace and cut out 2 pumpkins from the provided template, using orange felt. Also cut out 2 leaves and 2 stems from green felt. Using the running stitch, stitch along the edge of the leaves. See photo B. Attach the stem to the pumpkin as you stitch along the top edge of the pumpkin, using the running stitch. Now continue to stitch along the edge and inner lines of the pumpkin. The stitches should be about 1/8” in from the edge. Again see photo B. Now attach the leaf to the pumpkin using the back stitch down the center of the leaf. Also stitch along the edge of the stem using the running stitch.
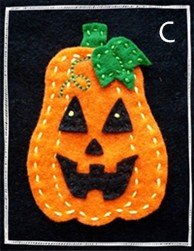
Trace and cut out the pumpkin face from black felt. Using the running stitch, attach the face to your pumpkin. See photo C. The yellow dots in the eyes were made using a French knot. Use the back stitch to add the vine to your pumpkin.
Step 3:
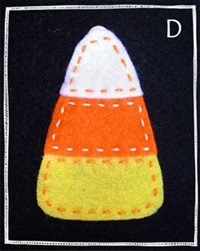
Trace and cut out 3 white candy corn tops, 3 orange middles, and 3 yellow bottoms. Place the white top piece on top of the orange middle piece with about 1/4” of overlap. Using the running stitch, stitch the white top to the middle with orange thread. Now using white thread, stitch the middle piece to the bottom piece. Now stitch the bottom piece with orange thread. See photo D.
Step 4:
Sew a button onto the back of each pumpkin, ghost and candy corn. Sew it close to the top of the felt, using only the bottom 2 holes of the button. The top 2 holes will be used to attach the felt shape to the jute or string.
Step 5:
See our
How to Make a Raffia Bow
page to learn how to make these bows. Make 8 bows.
Step 6:
Cut about a 48" length of jute or string. Tie a loop at each end to hang it by. Then tie your garland pieces onto the string:
Start at one end with a raffia bow. Tie the bow on with about a 10" piece of raffia. Just wrap it around the bow's center and tie a knot in the back. The felt pieces will be tied on with a piece of embroidery thread anchored through the button. Your Halloween garland is now finished!
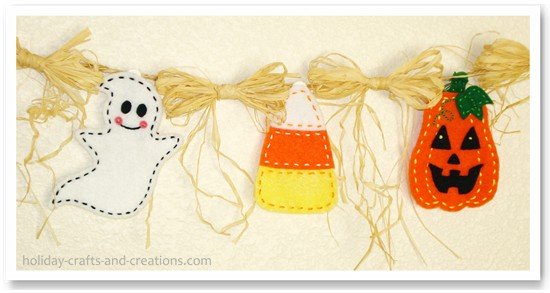
We hope you enjoyed this spooky garland project! For more homemade Halloween crafts and ideas, click the link below.
Return to Halloween Crafts From Homemade Halloween Decorations:
Halloween Garland

Janet Says:
Wonderful, I'll try to do it with my pupils. Thank you!
beatles girl Says:
awh cute this will be fun to make :D
Arlene Says:
I really like these! I think I may sew two together though and put a little batting in between the layers so they are a bit "puffy".
JEssica Says:
this is sooo cute to make! i luv it!
Dulce De Leon Says:
Great, I love this project. Thanks for sharing.
alma Says:
Love it! Can't wait to make mine. Thank you so much.
Anonymous Says:
awh its cute!
NHERI Says:
nice!!!!
Yuri Says:
I made mine!!! I love it...it's an awesome idea (-:
Kim Says:
Love this my grandchildren have fun! Many thanks
Renee Says:
Right on and solid
Holly Says:
I am so..... excited to give it a try.....
Hester Says:
Wonderful!!! Thank you
NAN Says:
COOL!!!!!!!
Meeru Says:
I love this and have just this evening cut out my shapes. Tomorrow I'll be sewing (first time for many years so wish me luck!) Thank you for sharing this fab garland!
Erin Says:
Love Love Love it! Can't wait to make mine!
Becky Brown Says:
Oh, my! This is just adorable!!!
carrieann Says:
they are cool x
rebe Says:
this is just great a fabulous idea!!
NOLAN Says:
I LIKE IT.
Homemade Halloween Decorations: Halloween Garland